
Flagging an email in Outlook marks it to be easily found and followed up at a later date. The email will be displayed with a red flag on it. This makes it easier to find important messages without sifting through your inbox.
You can flag any email in your inbox, sent, draft, and archive folders. Similarly, you can also flag an email before you send it to your recipients. This guide shows you how to flag your emails on the Outlook desktop and web apps.
Flagging Sent or Received Emails
Outlook lets you flag emails that you receive from others. Similarly, you can flag an email you have previously sent. This feature can be done in both the desktop and web apps with the same steps below.
- Launch the app (or Outlook.com) and go to the email you want to flag.

Navigate to the email you want to flag. - Hover over the email in the inbox/sent folder until you see a flag icon to the right of the email in your inbox.

Locate the flag icon. - Left-click on the flag icon to mark the email. By default, the flag will use the current date as its Start and Due Dates for follow-up.If you want to use another date, right-click the flag icon. Then, choose a date for the task:
- Today. The start and due dates are the current date.
- Tomorrow. The start and due dates are the current date plus one day.
- This week. The start date is two days from the current date, and the due date is on the last workday.
- Next week. The start date is on the first workday of next week, and the due date is on the last workday of that same week.
- No Date. No specific dates for the start and due dates.
The email will display a darkened flag icon and follow up information about the flag.

Flagging To-Be-Sent Emails (Only on the Outlook Desktop)
Before sending an email, you can flag it for yourself, your recipient/s, or both. However, this feature is only available on the Outlook desktop app.
- Compose your email in the Outlook desktop app as usual.

Create your email. - In the “Tags” group in the top ribbon, select Follow Up.

Click the Follow Up button. - Select Custom in the drop-down menu.

Click on Custom. - To flag the email for yourself, check the Flag for Me box.
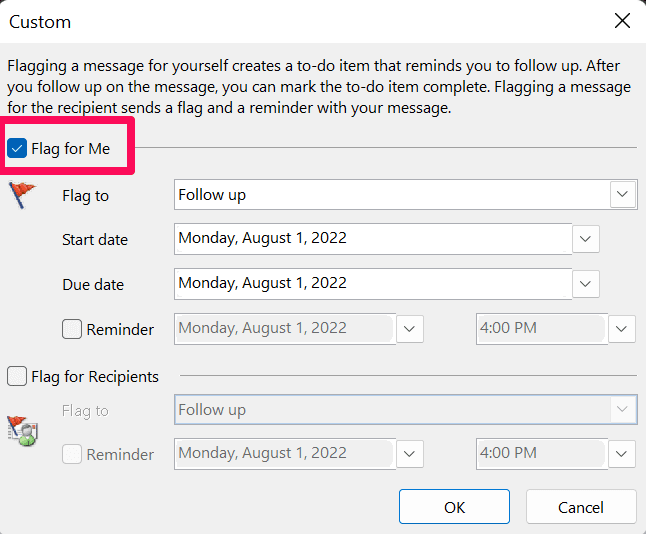
Tick the Flag for Me checkbox. Select a flag option in the “Flag to” drop-down menu.

Pick an option in the Flag to drop-down menu. Choose your start and due dates.

Select your start and due dates. (Optional) Tick the Reminder box and select a date and time for the reminder to notify you about your flag.

Tick the reminder checkbox and set a date and time. Hit OK. Information about the flag will be shown on top of your email. Then, hit Send.

Click on OK. 
Check the flag information on the email. Then, click Send. - To flag the email for your recipients, check the box for Flag for Recipients.

Tick the checkbox for Flag for Recipients. Choose a flag option in the “Flag to” menu.

Select the flag option. (Optional) Check the Reminder box and pick a date and time for the reminder to notify your recipients.

Mark the Reminder checkbox and choose a date and time. Select OK. You will see information about the flag on top of the email. Then, click Send.

Click OK. 
Check the flag information. Then, hit Send. - To flag the email for you and your recipients, do steps 4 and 5, keeping both checkboxes ticked. The flag information will then be displayed as such:

Email displays information when both you and your recipients are flagged.