
An out-of-office message is an automatic reply sent to people to notify them that you are away from work. It is a professional way to let them know how long you will be gone, when you will be back and who to contact instead. Here’s how to set up an out-of-office message on the Outlook desktop and web apps.
Set Out of Office Message in the Outlook Web App
- Sign into outlook.com.
- Click on the gear icon in the top-right corner.

Select the gear icon. - Click on View all Outlook settings at the bottom of the page.

Click on View all Outlook settings. - In the Mail tab, go to Automatic replies.

Select Automatic replies. - Toggle the Automatic replies on button.

Switch the “Automatic replies” toggle on. Tick the checkbox for Send replies only during a time period if you want to set a specific time range to send out automatic replies. Then, you can set the start and end times.

Check the box for “Send replies only during a time period.” 
Pick a date and time. Tick the checkbox for Block my calendar for this period and add a name in the text box under it if you want your Outlook calendar to reflect the dates you’re away.

Check the box for “Block my calendar for the period.” Mark the checkbox for Automatically decline new invitations for events that occur during this period if you prefer.

Tick the checkbox for “Automatically decline new invitations for events that occur during this period.” Mark the checkbox for Decline and cancel my meetings during this period if you prefer. Choose from the list what meetings to decline and cancel.

Tick the checkbox for “Decline and cancel my meetings during this period.” - Compose your out-of-office message in the text box under “Send automatic replies inside your organization”.

Compose your automatic reply. - Check the box for Send replies outside your organization if you want to send automatic replies to people outside your company. This can include your clients, suppliers, contractors, and anyone else who doesn’t work in your company.

Tick the checkbox for “Send replies outside your organization.” You can check the Send replies only to contacts box to only send automatic replies to people in your contact list.

Tick the checkbox for “Send replies only to contacts.” Compose your automatic reply in the text box. You can copy your message or create a new one if you want to send a different reply to people outside your organization. Then, click Save.

Type your automatic reply. 
Click on Save.
Set Out of Office Message in the Outlook Desktop App for Microsoft 365 and Exchange Users
If you’re using an outlook.com email or a company email subscribed to Microsoft 365, the following steps apply to you.
- Open the Outlook app and click on File on the far-left side of the menu bar.

Click on File. - Select Automatic Replies (Out of Office) under “Account Information.”

Click on Automatic Replies. - Choose Send automatic replies.

Click on Send automatic replies. - Mark the checkbox for Only send during this time range to enable automatic replies during a specific period.

Tick the checkbox for “Only send during this time range.” Choose the start and end times.

Choose the start and end times. - Type your automatic reply in the text box under the “Inside My Organization” tab. This message will be sent to people from within your company if they contact you during your set dates.

Write your automatic reply. - Click the Outside My Organization tab if you also want to send emails to people outside your company while you’re away.

Click on Outside My Organization. - Tick the box for Auto-reply to people outside my organization.

Mark the checkbox for “Auto-reply to people outside my organization.” Choose from either My Contacts only or Anyone outside my organization.

Select one recipient option. Type your automatic reply in the text box. This can also be the same message you created for people inside your organization or a completely different one solely for people outside your company. Then, press OK.

Write your automatic reply. 
Click on OK.
Set Out of Office Message in the Outlook Desktop App for IMAP/POP Users
The following steps are only applicable to IMAP/POP users, such as gmail.com, yahoo.com, and any other email provider outside of Microsoft.
- Launch Outlook and select New Email.

Click New Email. - Add a subject and compose your out-of-office message. You don’t need to fill in the “To” field.

Write your message. - Go to File in the top-left corner.

Click File. - Click on Save As in the left sidebar.

Select Save As. - Select Outlook Template in the “Save as type” drop-down menu.

Choose Outlook Template. - Hit Save.

Click Save. - Go back to your email window and click on the X icon to close it.

Close the window. - Select Yes in the pop-up window.

Click Yes. - Return to the Outlook window and go to File.

Select File. - In the Info tab, choose Manage Rules & Alerts.

Click Manage Rules & Alerts. - In the “Email Rules” tab, click on New Rule.

Select New Rule. - Under “Start from a blank rule” section, select Apply rule on messages I receive. Then, press Next.

Click Apply rule on messages I receive. 
Click Next. - In the window for “Which condition(s) do you want to check?,” click Next.

Click Next. - Select Yes in the pop-up window.

Click Yes. - In the “What do you want to do with the message?” window, mark the checkbox for reply using a specific template.
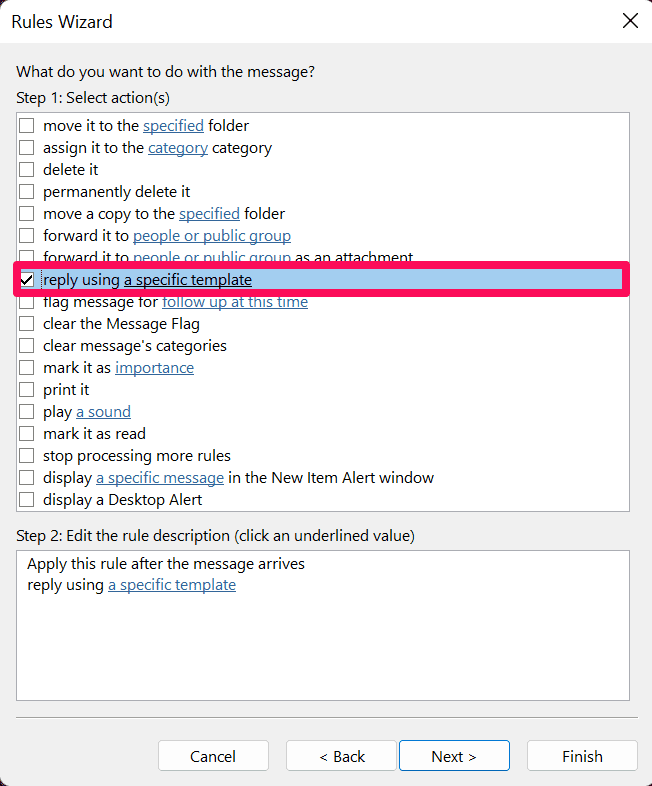
Tick the box for “reply using a specific template.” - In “Step 2: Edit the rule description,” click a specific template.

Click a specific template. - Click the Look In drop-down menu.

Click Look In. - Select User Templates in File System.
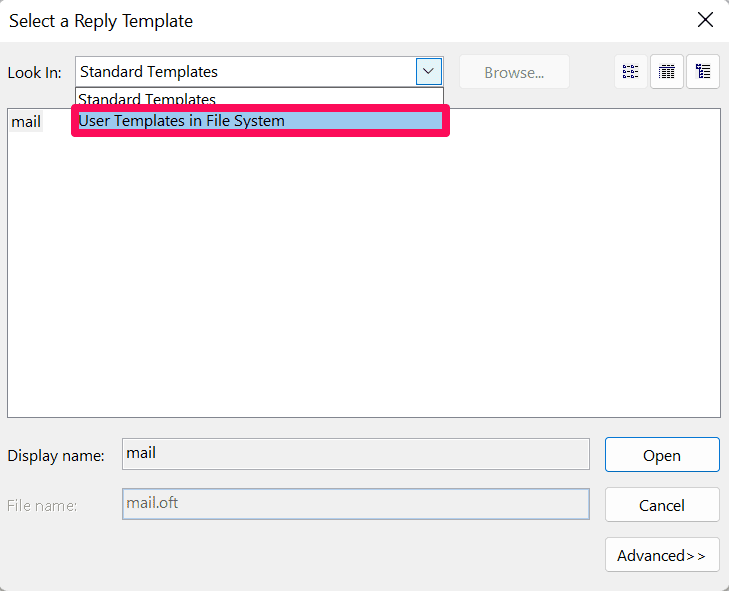
Choose User Templates in File System. - Select the template you already created.

Click your template. - Click Open.
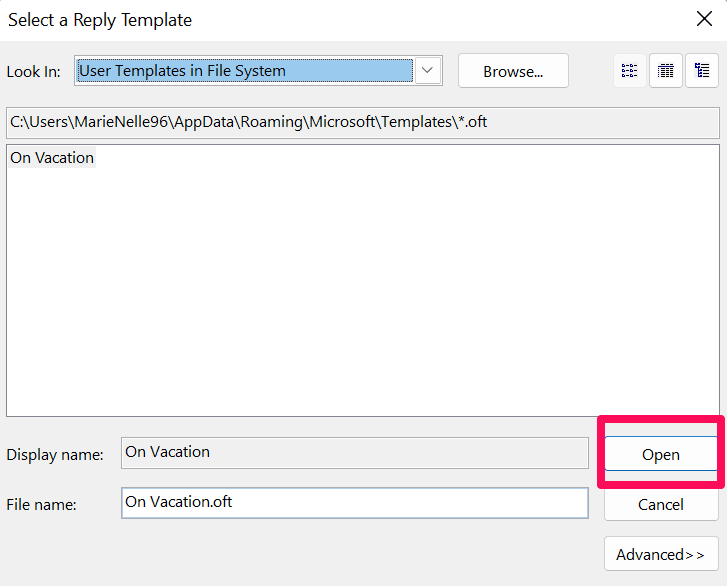
Click Open. - Then, click Next.

Click Next. - In the “Are there any exceptions?” window, click Next (unless you want to add an exception).

Click Next. - Type a name for the rule under “Step 1: Specify a name for this rule.”

Enter your rule name. - Under “Step 2: Setup rule options”, keep the box for Turn on this rule checked if you want your rule to be applied right away. Your automatic reply will be sent to all messages you receive moving forward. If you don’t want to activate your rule yet, uncheck the box.

Keep the checkbox for “Turn on this rule” ticked. - Select Finish.

Click Finish. - In the “Rules and Alerts” window, select Apply.
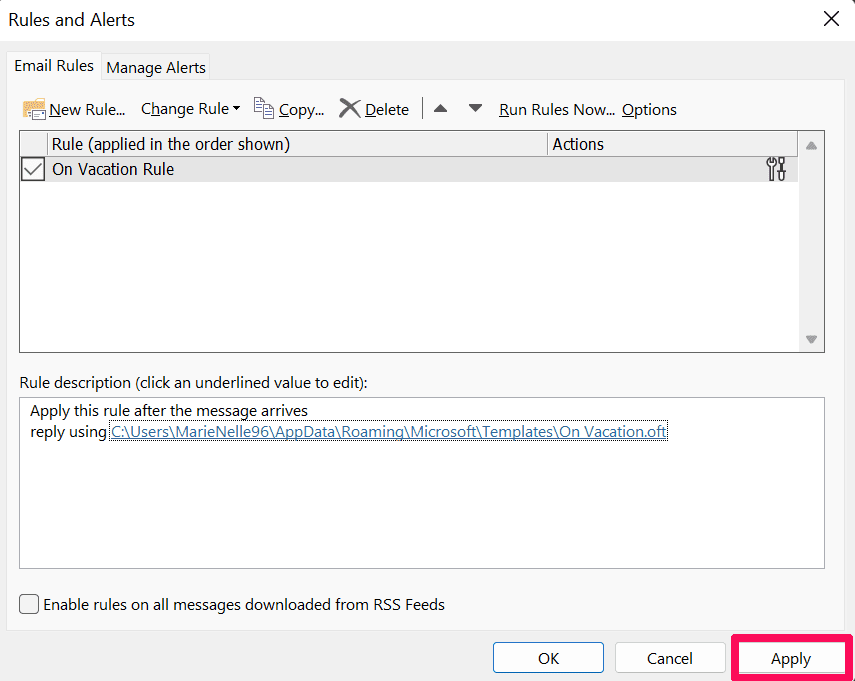
Click Apply. - Then, click OK.

Click OK.